Archive for image

Shoot Early; Shoot Late

Posted in Composition, Equipment, Photo Tips and Musings, Techniques with tags , , , , , , , , on January 21, 2010 by lpicker

“How do you get such saturated colors in the sky?” I am often asked.

“I bet you use fancy filters.”

“Hey, you added those colors in Photoshop, didn’t you?” wink, wink.

Well, my blog friends, I hate to disillusion you, but those colors come from something called sunrise. Pure, natural, 100% organic sunrise. And to capture them you have to get up before sunrise, trek to your preferred location, set up your equipment, pray that it doesn’t rain or cloud over, and then spend the next hour shooting like a maniac.

Sandhill Cranes in Flight

While everyone else is out having a good time during the day, I’m stumbling about in a sleep-deprived daze. Then, around dinnertime, I pull out one solid excuse from my Photographer’s Handbook, and sneak away for another hour of sunset shots. That, in a nutshell, is how a pro photographer captures those magical colors in the sky.

In fact, photographers call the two hours after sunrise and before sunset the ‘magic hours.’ From the perspective of physics that makes sense. When the sun is nearly at the horizon light is penetrating considerably more atmosphere than it does at noon. That slows light down and slower light bends it toward the red end of the visible light spectrum. We humans have a proclivity for reddish colors. They seem ‘warmer’ and more pleasing and peace-inducing to our brains.

Early-Late light also has other properties that tend to transform snapshots into eye-candy. When the sun is low to the horizon it creates longer shadows. That adds depth and texture to images, especially to landscapes.

Abraham Lake Sunrise

Sunrise and sunset are appealing to photographers for another reason. They are typically the hours when wildlife is most active, so your chances of capturing that perfect image of a fox or a bear or any manner of feathered creatures rise exponentially.

If you are traveling abroad, the hours just after sunrise are terrific for photographing local markets. There is typically a lot of hustle and bustle during that period, so with a medium telephoto lens you can stand unobtrusively in a doorway and shoot people setting up their stalls and arranging their exotic wares. (If you intend to use the images for commercial publication, be sure to get model releases from the people you photograph if they are recognizable in the photo… more on that in a later blog).

Sunset is an equally magical time to shoot, although you will most definitely run into more photographers at sunset than at sunrise. Sometimes the fight for photographic territory can be intense at sunset in places like the South Rim of the Grand Canyon.

Sunrise Over Tundra

Whatever its challenges, the aesthetic rewards of shooting early and late easily make it worthwhile. And don’t think you need to travel to some exotic locale. Just set your alarm and witness your own backyard in a totally different perspective.

Last year I remember being in Yukon Territory. I set my alarm for 3:00 AM to photograph the spectacular northern lights over the Yukon River. In the morning, one of my local hosts asked what I was doing up so early. I mentioned my drive up the local mountain to get a good view of the aurora. He had lived in the Yukon for five years. He flat out told me that he had only seen the lights once!

In terms of equipment I always use my tripod for sunrise/sunset because I want maximum depth-of-field, which slows the shutter speed. Add a cable release and you are set… well, almost. I also use filters at sunrise and sunset.

When you photograph sunrise/sunset, the sky begins to light up while the land in the foreground is still relatively dark. The lighter sky fools your meter into thinking it needs to close down the aperture to restrict the light hitting the sensor. That will render the foreground black, with no details in the shadows.

The way to compensate for this is to use a graduated neutral density filter. A GND filter is a piece of plastic or glass that you place in front of the lens. It is darker at the top and gradually becomes transparent about halfway down. In essence you are putting sunglasses only on the sky portion of your image. Just slide the filter until only the sky is shaded and- voila! – you have the prefect sunrise image. GND filters come is various strengths and with trial and error, and liberal use of the histogram, you will become proficient in their use. I use GNDs from Singh Ray (www.singhray.com) and Lee filters (www.leefiltersusa.com) or you can purchase them through B&H (www.bandh.com) or Adorama (www.adorama.com). In a future blog I’ll explain how to use these GNDs in more detail.

Kapalua Sunset

Singh-Ray makes a specialty filter known as a Daryl Benson Reverse Neutral Density Graduated Filter. I know that’s a mouthful, but here’s what it does that proves very useful. Let’s say you want to shoot a sunrise where the sun is just peeking out over the horizon. That bright orb will blow out your shot and ruin your image. The Reverse ND filter places a band of ‘sunglasses’ right across the horizon zone, holding back some of that light and allowing for a nicely exposed image in most cases.

Try getting up tomorrow before dawn and you’ll be amazed at what awaits in your own town or neighborhood!

Lester Picker is a professional landscape and wildlife photographer living in Maryland. He welcomes questions from his blog readers on any photography-related question.  Visit Les’ website at: www.lesterpickerphoto.com


Shoot Tight!

Posted in Composition, Nature, Photo Tips and Musings, Techniques, Wildlife with tags , , , , , , , , on May 23, 2009 by lpicker

How would you like to increase the dramatic impact of your photography by an order of magnitude? I’m not exactly sure what that last phrase means, but it sounds impressive. This is what I do mean, though. If there is one photographic technique that can put your images on steroids, it’s shooting tight.

Galapagos Tortoise

By shooting tight, I’m referring to zooming in on the subject so that you remove distracting elements and instead highlight its most salient feature(s). Take the photo below as an example. I shot it on one of my trips to the Galapagos Islands off the coast of Ecuador. In and of itself the photo is ‘okay.’ It’s a textbook example of the giant Galapagos tortoise, the same ones documented by Charles Darwin in the 19th century. Therein lies the problem with the image. Like a textbook, it’s b-o-r-i-n-g. It would be fine for a biology text, but it lacks punch. Zero drama.

Now take a look at this image, shot the same day. See the difference? Notice the emotional impact?

Galapagos Tortoise-tight

Nazca Booby with Chick-wide

The same concept holds true for the following images. The Nazca Booby was photographed in the Galapagos and everyone else I was with photographed the mother and bird as a whole, as I initially did. Some even shot the scene wide angle to get in the rocks and water in the background, thereby making it hard t see the mother and chick at all. I managed to squeeze off a few telephoto shots of the baby alone and I like the effect (hopefully my editors will, too).

Nazca Booby with Chick-tight

amusement park-wide

This next series really show two images with entirely different effects. However, I just wanted to show how shooting tight can result in creative applications that may not be immediately apparent in the wider image. I took this initial shot for a series on amusement parks. This was taken at Salem Willows in Massachusetts.

The tight rendition is the stuff of kids’ nightmares, a bas relief of Chucky.

amusement park-tight

Finally, shooting tight works wonders for people shots, but I’ll leave that topic for another day.

Les Picker is a professional photographer living in Maryland. He is happy to address specific photographic questions from his blog readers. Visit his website at: www.lesterpickerphoto.com

SHOOT HIGH-SHOOT LOW!

Posted in Composition, Landscape, Nature, Photo Tips and Musings, Techniques, Wildlife with tags , , , , , , , , , , , , , , , on May 23, 2009 by lpicker

I don’t mean to be sarcastic… no, I take that back. I do mean to be sarcastic. Here goes. There is no rule that says you must hold your camera at eye level, in a standing position, with the camera in landscape orientation every time. There, I said it!

As a professional photographer and former editor, I figure that about 98% of all photos taken by amateurs are in landscape orientation. That, in itself, would not be so bad. But when you couple that with the dreaded eye-level perspective, the results are often dull and uninteresting, true snapshots rather than exciting photographs.

If you’re primarily into snapshots, that’s fine. There’s nothing like a snapshot of the Pyramids (if you can get one without shops and hawkers that encroach ever closer every year) or the husband standing at the rim of the Grand Canyon (“Go ahead, Honey, keep backing up… a few more steps…”). But to get truly unique images, to move beyond snapshots to true photographs, try this technique of the pros; Shoot High and Shoot Low.

Navajo Tree and Cliff

The main take-away to this tip is to move away from what I call the plane of conformity. Since most people take a picture standing up, try photographing from a crouched position or from your knees. I took the photo below on Navajo land in Utah. While others stood around photographing this interesting tree, I laid on my stomach and shot this from root level. Maybe the shot works for you and maybe it doesn’t. Art, after all, is subjective. But the image is not the typical one you would see associated with this particular view. To my eyes the image benefits from the down-low perspective.

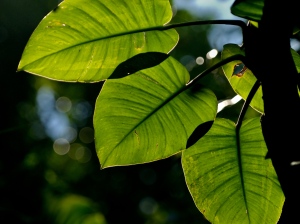
hawaiiphilodendronleaves

In a similar vein, my wife and I were hiking Hawaii’s spectacular Napali Coast on the island of Kauai. At an overpass, everyone else on the trail took a photo of one particular scenic view. Each person would approach the lookout, bring the camera up to their eye and shoot the very same shot. Again, there’s nothing wrong with that, since you’ve captured that memory forever. But, whenever I see people taking the same exact photo, I turn around and look the other way. I look up, I look down. In this case, I spotted the sun backlighting these philodendron leaves, high above my head.

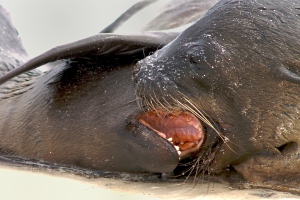
galapagossealionpups

For this close-up of sea lion pups playing in the Galapagos, I laid down in the sand for twenty minutes, shooting away while the pups frolicked. Sure my elbows and clothes got wet, but I came away with a series of shots I wanted.

marshgrassesatdawn

A similar thing happened with this shot of marsh grasses. I had to lay down on the boardwalk of a nature center at sunrise to capture this image.

Egypt-Marbles

Here’s another Shoot High-Shoot Low tip. When photographing kids, get down to their level. I took this shot of a boy playing marbles in Luxor, Egypt. Had I stood up and shot eye level, the shot would have lost out. By crouching down and pointing my camera up at the boy, I got a marble-ous perspective on the game (ok, I never said I was an expert punner).

So, next time you’re out photographing, be bold, be adventurous. Shoot High-Shoot Low. Heck, just shoot. I think you’ll be happy with your results.

Lester Picker is a professional photographer living in Maryland. He welcomes questions about photography addressed to his blog. Les also gives one-on-one and small group workshops for aspiring and intermediate photographers. Visit Les’ website at: www.lesterpickerphoto.com